Imagine being able to control your IoT devices from anywhere in the world with just a few clicks. The RemoteIoT web SSH server on Windows 10 is your golden ticket to achieving this level of convenience and control. In today's fast-paced world, remote access has become more than just a luxury—it's a necessity. Whether you're a tech enthusiast, a developer, or just someone who wants to stay connected to their devices, this setup can revolutionize the way you interact with your gadgets.
Picture this: you're lounging on a beach in Bali, sipping a cocktail, and you suddenly remember that you left your smart thermostat at home set to max cooling. No worries! With RemoteIoT web SSH server on Windows 10, you can adjust it from your phone or laptop in seconds. It’s like having a digital butler at your fingertips.
Now, before we dive deep into the nitty-gritty of setting up and using this powerful tool, let me assure you that this isn’t just some geeky jargon-filled article. We’ll break it down step by step so that even if you're not a tech wizard, you'll be able to set it up like a pro.
Read also:9kmovies In The Ultimate Guide To Streaming Movies Online
What is RemoteIoT Web SSH Server?
Let's start with the basics. The RemoteIoT web SSH server is essentially a bridge that connects your IoT devices to the internet, allowing you to access and control them remotely. SSH, or Secure Shell, is a cryptographic network protocol that lets you securely manage your devices over an unsecured network. When combined with Windows 10, it becomes a powerhouse for remote device management.
Think of it as a secret tunnel that lets you talk to your devices from anywhere in the world, without worrying about prying eyes or hackers. This setup is perfect for anyone who wants to keep their IoT ecosystem secure while still having full control over it.
Why Should You Use RemoteIoT Web SSH Server?
There are plenty of reasons why you should consider setting up a RemoteIoT web SSH server on Windows 10. Here are just a few:
- Security: SSH provides end-to-end encryption, ensuring that your data and commands are safe from interception.
- Convenience: Access your IoT devices from anywhere in the world, as long as you have an internet connection.
- Cost-Effective: You don’t need to invest in expensive hardware or subscriptions. All you need is a Windows 10 machine and a bit of know-how.
- Scalability: Whether you have one IoT device or a whole network of them, this setup can grow with you.
Now that you know why it's worth it, let's get into the details of how to make it happen.
Setting Up RemoteIoT Web SSH Server on Windows 10
Step 1: Install OpenSSH on Windows 10
The first thing you need to do is install the OpenSSH server on your Windows 10 machine. Here's how you can do it:
- Go to Settings >Apps >Optional Features.
- Click on Add a feature and search for OpenSSH Server.
- Select it and click Install. This might take a few minutes, so grab a snack while you wait.
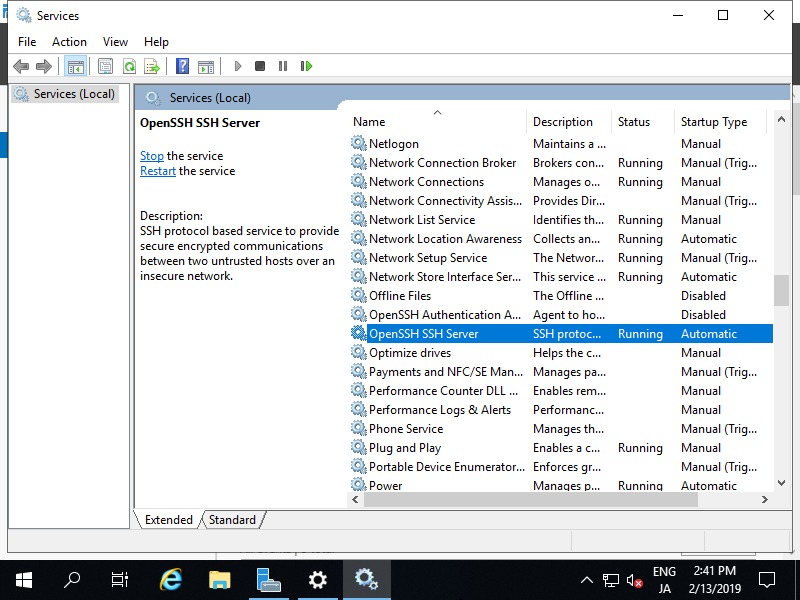
Once the installation is complete, you'll need to enable the service. You can do this by running the following command in PowerShell:
Read also:Mastering Remote Iot Vpc Ssh Raspberry Pi The Ultimate Guide
net start sshd
And just like that, you've got yourself an SSH server running on your Windows 10 machine.
Step 2: Configure Firewall Settings
For your SSH server to work properly, you’ll need to allow incoming connections through your firewall. Here's how to do it:
- Go to Control Panel >System and Security >Windows Defender Firewall.
- Click on Advanced settings and then Inbound Rules.
- Click New Rule and select Port.
- Enter 22 as the port number and allow the connection.
And there you go! Your firewall is now configured to let SSH traffic through.
Connecting to Your RemoteIoT Web SSH Server
Now that your server is set up and ready to go, it's time to connect to it. Here's how you can do it:
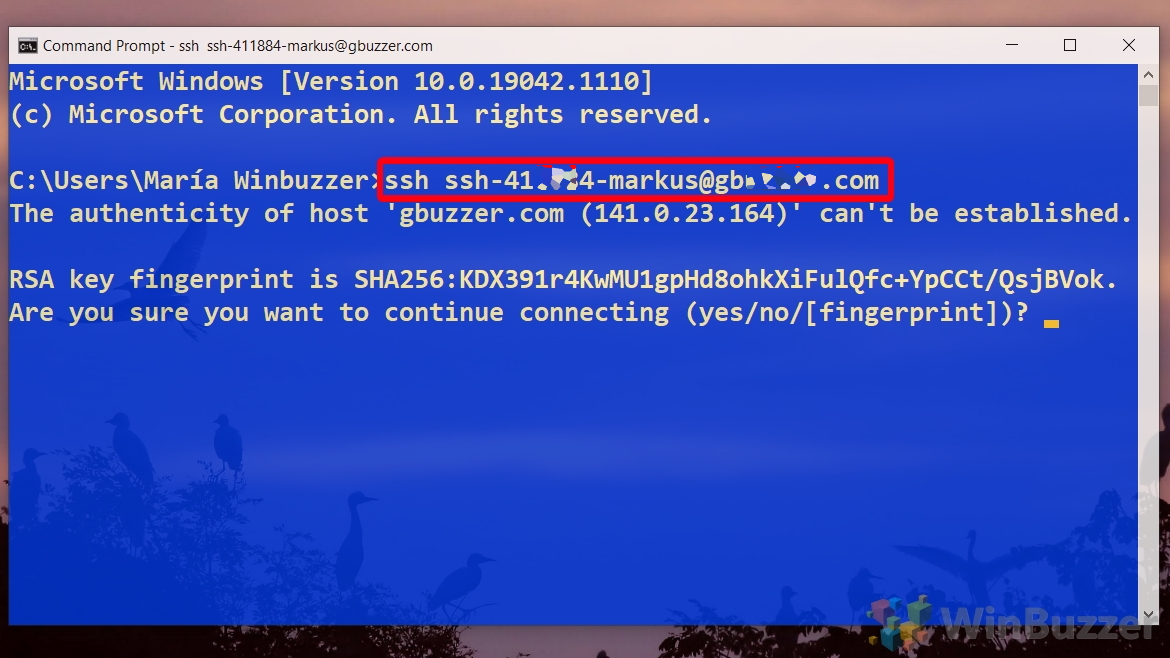
- Open a terminal on your local machine.
- Type ssh username@your_windows_ip, replacing username with your actual username and your_windows_ip with the IP address of your Windows 10 machine.
- Enter your password when prompted, and you're in!
It’s as simple as that. You’re now connected to your RemoteIoT web SSH server and can start managing your IoT devices.
Troubleshooting Common Issues
Even the best-laid plans can go awry sometimes. Here are a few common issues you might encounter and how to fix them:
- Connection Refused: Make sure that your SSH server is running and that your firewall settings are correct.
- Authentication Failed: Double-check your username and password. If you’re still having trouble, try resetting your password.
- Timeout Errors: This could be due to network issues. Check your internet connection and ensure that your router is configured correctly.
Remember, troubleshooting is all about patience and persistence. Keep at it, and you’ll get it working in no time.
Best Practices for Securing Your RemoteIoT Web SSH Server
Security should always be at the forefront of your mind when setting up a remote access system. Here are some best practices to keep your RemoteIoT web SSH server secure:
- Use Strong Passwords: Avoid using common words or phrases. Mix uppercase and lowercase letters, numbers, and symbols.
- Enable Two-Factor Authentication: This adds an extra layer of security to your login process.
- Regularly Update Your System: Keep your Windows 10 machine and all related software up to date to protect against vulnerabilities.
By following these practices, you can ensure that your RemoteIoT web SSH server remains secure and reliable.
Exploring Advanced Features
Setting Up Port Forwarding
Port forwarding allows you to access your SSH server from outside your local network. Here's how to set it up:
- Log in to your router’s admin interface.
- Find the Port Forwarding section and add a new rule.
- Set the external port to 22 and the internal IP to your Windows 10 machine’s IP.
With port forwarding set up, you can now access your server from anywhere in the world.
Automating Tasks with Scripts
One of the coolest things about SSH is that you can automate repetitive tasks using scripts. For example, you could write a script that automatically checks the status of your IoT devices and sends you an email if something’s amiss.
Here’s a simple example of a bash script that checks the status of a device:
#!/bin/bash
status=$(ssh user@device_ip "check_device_status")
if [ "$status" =="offline" ]; then
echo "Device is offline" | mail -s "Alert: Device Offline" your_email@example.com
fi
Scripts like this can save you a lot of time and hassle, so it’s definitely worth exploring.
Real-World Applications
The applications for a RemoteIoT web SSH server on Windows 10 are virtually endless. Here are a few examples:
- Home Automation: Control your smart home devices from anywhere in the world.
- Remote Monitoring: Keep an eye on your IoT devices and get alerts if anything goes wrong.
- Device Management: Update firmware, run diagnostics, and perform maintenance tasks remotely.
With a bit of creativity, you can use this setup to solve a wide range of problems and improve your quality of life.
Conclusion
Setting up a RemoteIoT web SSH server on Windows 10 might seem intimidating at first, but with the right guidance, it’s a breeze. From increased security to unmatched convenience, the benefits are undeniable. So what are you waiting for? Dive in and start exploring the possibilities today.
Don’t forget to share your experiences and tips in the comments below. And if you found this article helpful, be sure to check out our other guides on all things tech-related. Happy hacking!
Table of Contents
- What is RemoteIoT Web SSH Server?
- Why Should You Use RemoteIoT Web SSH Server?
- Setting Up RemoteIoT Web SSH Server on Windows 10
- Connecting to Your RemoteIoT Web SSH Server
- Troubleshooting Common Issues
- Best Practices for Securing Your RemoteIoT Web SSH Server
- Exploring Advanced Features
- Real-World Applications
- Conclusion