Alright, folks, let's dive into something super practical and essential for anyone working in the tech world—especially if you're dealing with IoT devices and cloud computing. RemoteIoT SSH AWS Example is not just a bunch of tech jargon; it’s your ticket to securely accessing and managing your IoT devices from anywhere in the world using Amazon Web Services (AWS). So, whether you're a developer, a hobbyist, or just someone who's curious about how remote access works, this article is for you. Stick around because we’re about to break it down step by step, no fancy lingo, just good ol’ actionable insights.
Now, why should you care? Well, imagine being able to monitor your smart home devices, control industrial sensors, or debug issues in your IoT setup without having to physically be there. That’s the power of remote IoT management. And when you throw SSH (Secure Shell) into the mix, you’ve got yourself a secure way to connect to your devices through AWS. But hold up, there’s more to it than just setting it up. You need to do it right, and that’s where we come in.
In this article, we’ll walk you through everything you need to know about using SSH with AWS for remote IoT management. From setting up your environment to troubleshooting common issues, we’ve got you covered. So, grab a coffee, get comfy, and let’s get started on this journey to mastering remote IoT SSH AWS examples.
Read also:Unveiling The Secrets Of Vegamovies Rs Your Ultimate Movie Streaming Destination
What is RemoteIoT SSH AWS Example?
Let’s kick things off by breaking down what exactly we mean by RemoteIoT SSH AWS Example. At its core, it’s a method to remotely access and manage IoT devices using SSH over AWS. AWS provides the infrastructure, while SSH ensures that your connection is secure and encrypted. Think of it like a digital handshake between you and your IoT devices, but with a whole lot of security features to keep the bad guys out.
Here’s the deal: IoT devices are awesome, but they’re only as useful as the control you have over them. If you can’t access them remotely, their potential is severely limited. That’s where SSH comes in. It allows you to establish a secure connection to your devices, enabling you to send commands, transfer files, and even troubleshoot issues—all from the comfort of your desk.
And why AWS? Well, because AWS is one of the most reliable and scalable cloud platforms out there. It offers a wide range of services that can be integrated with SSH to create a robust remote management system. Whether you’re dealing with a single device or an entire network of IoT gadgets, AWS has got your back.
Why Use SSH for RemoteIoT?
Now, you might be wondering, why bother with SSH when there are other ways to access remote devices? Great question! SSH offers several advantages that make it the go-to choice for secure remote access:
- Encryption: SSH encrypts all data transmitted between your device and the server, making it nearly impossible for hackers to intercept sensitive information.
- Authentication: SSH uses public and private keys to verify the identity of both the client and the server, ensuring that only authorized users can access your devices.
- Flexibility: SSH supports a wide range of protocols and commands, making it highly versatile for different use cases.
- Reliability: SSH is a mature and widely adopted protocol, meaning it’s been tested and refined over the years to ensure maximum reliability.
So, if you’re looking for a secure and dependable way to manage your IoT devices remotely, SSH is definitely the way to go. And when you combine it with AWS, you’ve got yourself a powerhouse of remote management capabilities.
Setting Up Your RemoteIoT SSH AWS Environment
Alright, let’s talk about setting up your environment. This is where the rubber meets the road, folks. To get started with RemoteIoT SSH AWS Example, you’ll need a few things in place:
Read also:Unlock The Power Of Remote Iot Vpc With Raspberry Pi For Free
Step 1: Create an AWS Account
If you don’t already have an AWS account, head over to the AWS website and sign up. It’s free to get started, and you’ll have access to a ton of resources to help you get familiar with the platform.
Step 2: Set Up an EC2 Instance
Amazon EC2 (Elastic Compute Cloud) is where you’ll host your SSH server. Here’s how you set it up:
- Log in to your AWS Management Console.
- Go to the EC2 dashboard and click on “Launch Instance.”
- Choose an Amazon Machine Image (AMI) that suits your needs. For beginners, the Amazon Linux 2 AMI is a great choice.
- Select an instance type. For testing purposes, the t2.micro instance is free tier eligible and works just fine.
- Configure your instance settings, including storage, networking, and security groups.
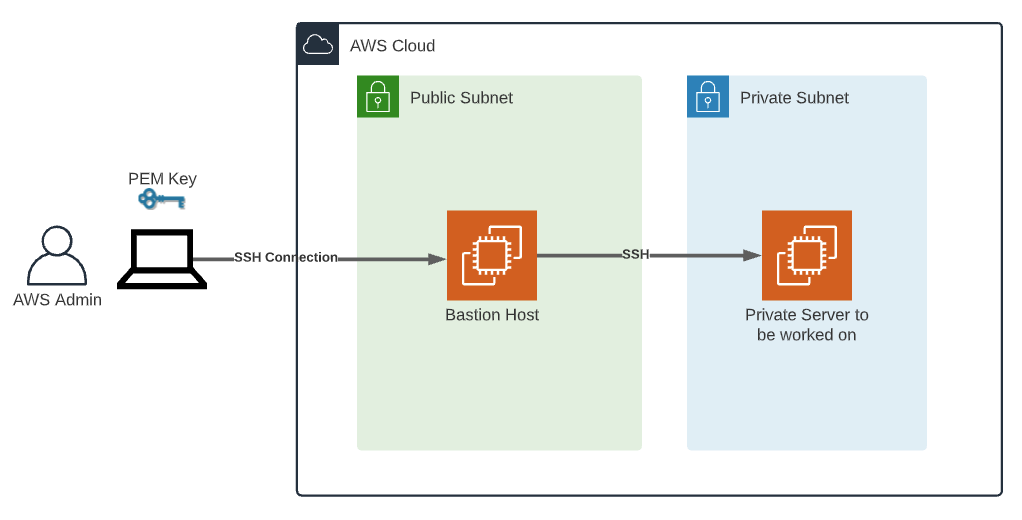
Make sure to allow SSH access in your security group settings. This will enable you to connect to your instance using SSH.
Connecting to Your IoT Device via SSH
Now that your EC2 instance is up and running, it’s time to connect to your IoT device. Here’s how you do it:
Step 1: Generate SSH Keys
SSH keys are like digital passwords that authenticate your identity. To generate them, follow these steps:
- Open your terminal or command prompt.
- Run the command:
ssh-keygen -t rsa -b 4096 -C "your_email@example.com". - Follow the prompts to save the key and set a passphrase if desired.
This will create a public-private key pair that you can use for authentication.
Step 2: Copy the Public Key to Your EC2 Instance
To copy your public key to your EC2 instance, use the following command:
- Run:
ssh-copy-id -i ~/.ssh/your_key.pem ec2-user@your_instance_ip. - Enter the password for the EC2 instance when prompted.
Once the key is copied, you’ll be able to connect to your instance without needing a password.
Managing IoT Devices with SSH
Now that you’re connected, it’s time to start managing your IoT devices. Here are some common tasks you can perform:
1. Sending Commands
Use SSH to send commands to your IoT device. For example:
- To check the status of a service:
sudo systemctl status your_service. - To restart a service:
sudo systemctl restart your_service.
2. Transferring Files
Need to transfer files between your local machine and your IoT device? Use SCP (Secure Copy Protocol):
- To send a file:
scp /path/to/local/file ec2-user@your_instance_ip:/path/to/remote/file. - To receive a file:
scp ec2-user@your_instance_ip:/path/to/remote/file /path/to/local/file.
Best Practices for RemoteIoT SSH AWS Example
While SSH is a powerful tool, there are a few best practices you should follow to ensure maximum security:
1. Use Strong Passwords
Make sure your SSH keys and any passwords you use are strong and unique. Avoid using common phrases or easily guessable information.
2. Limit Access
Restrict SSH access to only the IP addresses you trust. You can do this by configuring your security groups in AWS.
3. Regularly Update Your Systems
Keep your operating systems and software up to date to protect against vulnerabilities.
Troubleshooting Common Issues
Even the best-laid plans can go awry sometimes. Here are a few common issues you might encounter and how to fix them:
1. Connection Refused
If you’re getting a “connection refused” error, double-check your security group settings to ensure that SSH is allowed.
2. Permission Denied
This usually happens if your SSH keys aren’t set up correctly. Make sure you’ve copied the public key to your EC2 instance and that the permissions on your private key file are set to 400.
Conclusion
And there you have it, folks—a comprehensive guide to RemoteIoT SSH AWS Example. We’ve covered everything from setting up your environment to managing your IoT devices and even touched on some best practices to keep your setup secure. Remember, the key to successful remote management is preparation and attention to detail.
So, what’s next? Take what you’ve learned and start experimenting with your own IoT devices. And don’t forget to leave a comment or share this article if you found it helpful. Who knows, you might just inspire someone else to dive into the world of remote IoT management. Until next time, stay safe and keep coding!
Table of Contents